How use a Wyze Cam V2 as a Webcam


With the national shortage of webcams because of COVID-19, Wyze is providing a special firmware option to use their Wyze Cam V2 or Wyze Cam Pan as a regular webcam. Micro Center's Technical Support team have tested this and are providing the following instructions to show you how to flash the firmware on your Wyze Cam and adjust your computer's settings, so you can make conference calls and video chat using Zoom, Skype, etc.
Things to Know:
- Wyze Cams are not designed for this type of use normally. This is a special circumstance and Wyze has created this solution to aid people who have not been able to get a normal webcam.
- Once you flash the firmware, you will not be able to connect it to the Wyze app anymore, which means you can’t use it as it was originally designed. You can reflash the firmware later however to return it to normal use.
This is a new, quick solution and it is not something Wyze plans to support long-term and create fixes for. There is no guarantee of compatibility and you may experience bugs/issues. If you are experiencing issues, you will have to use this as-is and deal with those as best you can.
What You Need:
- Wyze Labs Wyze Cam V2 camera or Wyze Labs Cam Pan
- A MicroSD card with the appropriate firmware file on it - available from Micro Center with purchase of one of these Wyze cams.
- A standard USB Type A male to male cable to use the camera with your computer.
How to Flash the Wyze Cam V2 Firmware:
- Power off your Wyze Cam and insert the MicroSD card
- Hold the setup button, then while holding the setup button, plug in the power cable, and keep holding the setup button for 3-6 seconds until the light turns solid blue, then release the button. If your finger slips off the setup button, you will have to re-do this process
- Wait for 3-4 minutes. The camera will reboot and the status light will change.

Checking Windows Settings
- For Windows users, open Device Manager and check under Camera at the top. You can get to Device Manager by pressing the Windows Key + R and typing devmgmt.msc in the box labeled Open and clicking ok. If you see HD USB Camera you should be all set.

Checking Mac OS Settings
- For Mac users, click your Apple Menu on the top left, click About this Mac, then click System Report. Click Camera on the left and you should see HD USB Camera listed.

Using the Wyze Cam V2 as a Webcam
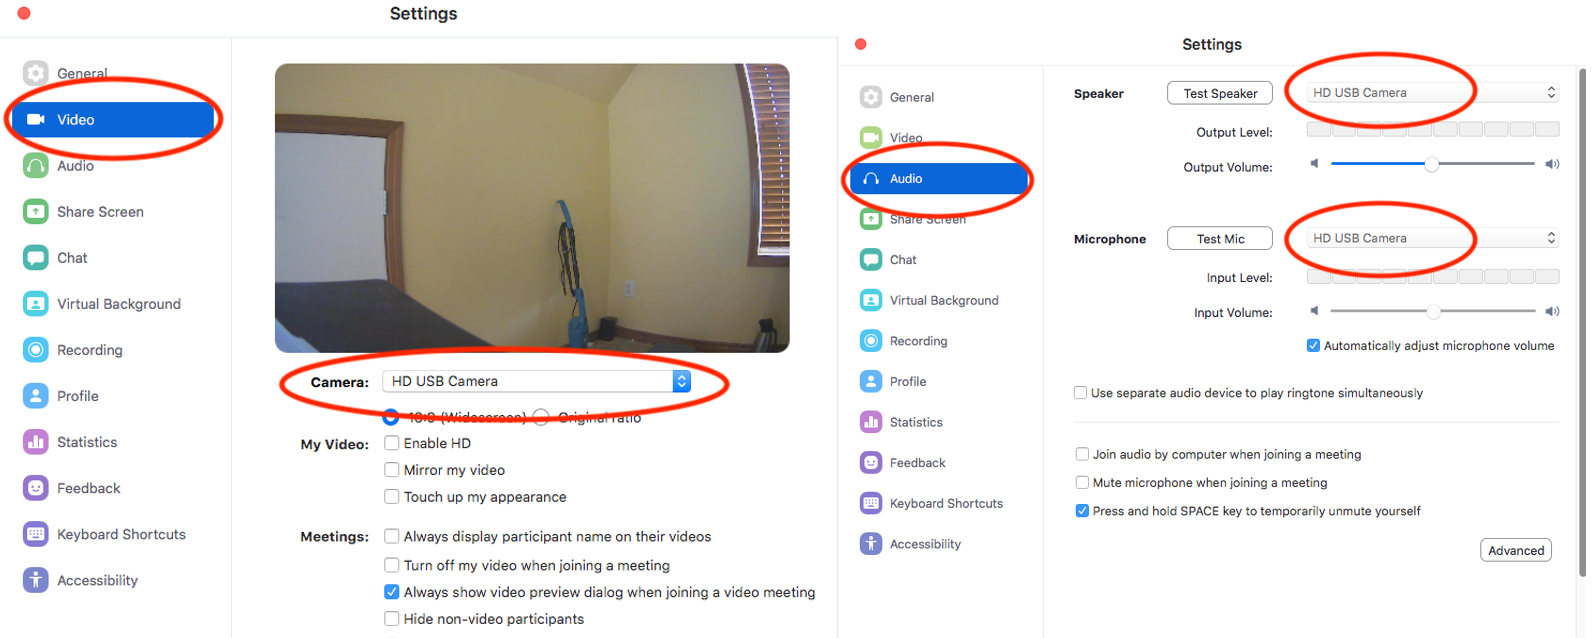
- With the webcam connected via the USB A cable navigate in the software (Zoom, Skype, etc) and change the camera source/device to HD USB Camera.
- Change the microphone input to HD USB Camera if you don’t have a separate mic.
Below is an example screenshot showing the Zoom application settings:
Let us know below if this works for you.


Categories
- All Categories
- 31 Micro Center
- 2 The Latest Announcements, News & Launches
- 29 Micro Center Store News
- Sales Questions
- Forum Feedback, and Suggestions
- 6 The Hangout
- 1 General Discussion
- 2 Trending at Micro Center
- Build Showcase
- 3 Off Topic
- 9 Build-Your-Own & PC Parts
- 7 Help Choosing Parts
- 1 Graphics Cards
- 1 CPU's, Memory and Motherboards
- Cases and Cooling
- Power Supplies
- Monitors, Keyboards, Mice & Other Peripherals
- 2 Consumer & Hobbiest Electronics
- Pre-Built Desktops & Laptops
- TVs & Home Theater
- Audio
- Cameras & Accessories
- 3D Printing
- 2 Hobby Boards, Retro Arcade & Other Projects
- 6 Operating Systems, Programming & Software
- 3 Windows
- 3 Apple
- Linux & Other Distributions
- Programming & Web Development
- Other Software
- Gaming & Content Creation
- PC Gaming & LFG
- Console Gaming & LFG
- Streaming & Content Creation
- Networking & Security
- Home Networking
- Home Security
- Firewalls & Protection
We love seeing what our customers build
Submit photos and a description of your PC to our build showcase
Submit NowLooking for a little inspiration?
See other custom PC builds and get some ideas for what can be done
View Build ShowcaseSAME DAY CUSTOM BUILD SERVICE
If You Can Dream it, We Can Build it.

Services starting at $149.99